Saturday, October 30, 2010

Social Saturday

I thought it would be fun to start a weekly post in which I can hear from you. I post all week about my thoughts, share my samples, and share with you what I have been working on but this is my opportunity to hear from you. So each week I will post a question and I want to hear your answer. To respond simply add a comment to the post before I randomly choose one comment on Monday. The persons who comment is chosen will receive a special handmade card made by me! Be sure to check back to see if your comment won!

Tomorrow is Halloween, and many kids will get dressed up and go out in their neighborhood to gather lots of treats! So tell me, what was your favorite Halloween costume? Or what are your children dressing up as this Halloween?

Friday, October 29, 2010

12 Weeks of Christmas - Week 4

This week I thought I would share one of the cards we will be making for my Stamp A Stack this weekend. For as long as I have been a demonstrator the Lovely As A Tree stamp set has always been in the catalog (5 years).  I think this is a favorite for everyone! I have to apologize as the "be merry" stamp is retired, however it just completed the card perfectly and I didn't have anything else that look quite as good. To create the backdrop image I created a square template and sponged with white craft ink inside. I also stamped the row of trees in white craft ink before moving the template so that it would appear only in the same square. Once this was dry I stamped the tall pine tree using the Garden Green & Chocolate Chip Markers. I stamped the sentiment (you could stamp any occasion), punched the circle and attached to top. I added the the jumbo eyelet using the Crop-A-Dile and tied a piece of the Cherry Cobbler 1/2" Seam Binding through the eyelet. Then I assembled the rest of the layers to the card. Simple yet beautiful and completely transformable for any occasion!


Supplies....................................................
Lovely As A Tree Stamp Set W#115026
Warm Words Stamp Set (Retired)
Whisper White Craft Ink #101731
Crop-A-Dile #108362
1" Circle Punch #119868
Jumbo Eyelets in Pewter #108432
1/2" Seam Binding in Cherry Cobbler #120992
Garden Green & Chocolate Chip Stampin' Write Markers
Crumb Cake, Cherry Cobbler Card Stock


Wednesday, October 27, 2010

Halloween Cupcake Holder


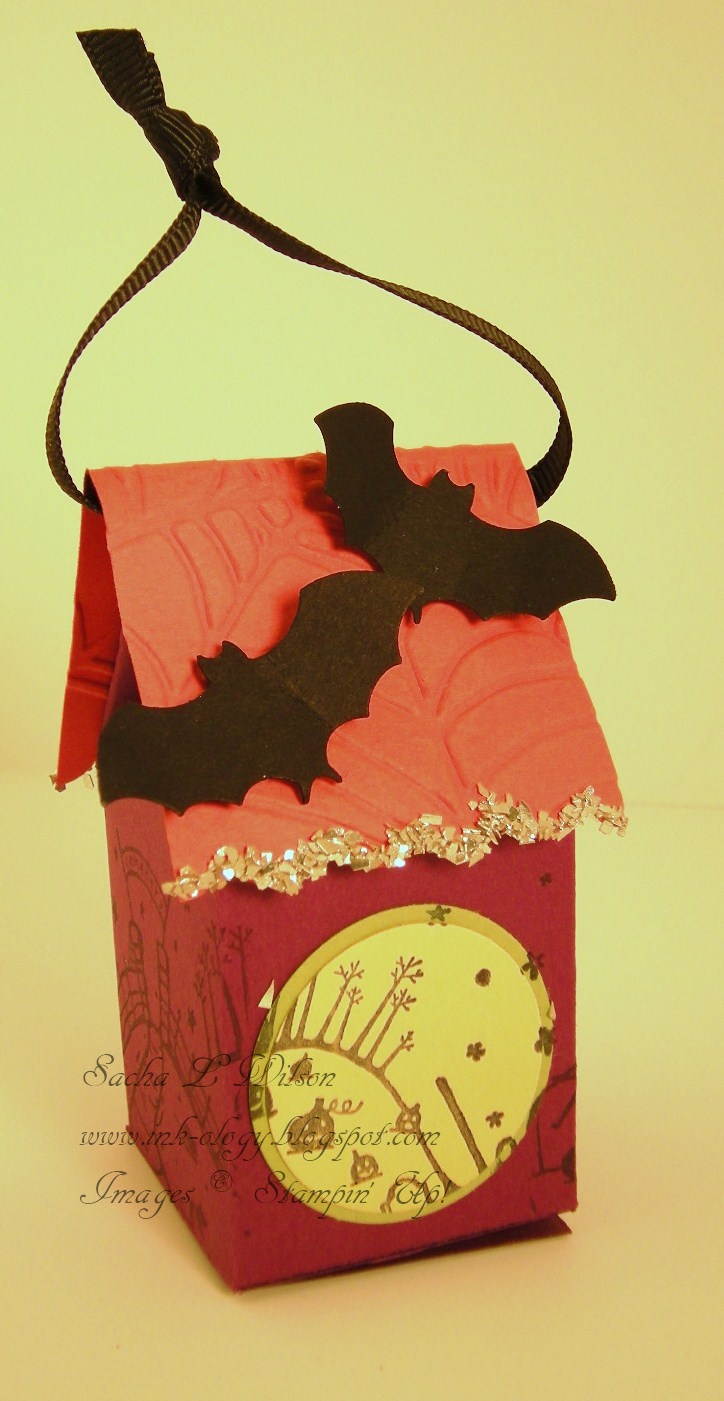
Here is another project we made in my Big Shot Club last week. You can make these to put cupcakes in, however I wanted my guest to be able to take something home with them (the cupcakes would not have made it!) so we filled the middle with a cupcake wrapper and in it we put a small piece of florist foam and some shreds to hide it. This is very simply made using the Perfect Setting Bigz XL Die with the Big Shot Die Cutting Machine and Designer Series Paper. Stampin' Up! has many different assortment of  Designer Series Paper so you could make these for almost any occasion. One package of DSP will make approximately 24 cupcake covers. The topper is made using the Batty For You stamp set, punches, dimensionals and a tooth pick. There are two layers of the scallop circle adhered together with the toothpick in the middle so that you don't see it. 

Click here to order Stampin' Up! 24/7!

Supplies...........................................
Big shot Die Cutting Machine # 113439
Perfect Setting Bigz Die # 115961
Wicked Fun Designer Series Paper #117400
Batty For You  Stamp Set W#116576
Scallop Circle Punch # 119854
1 1/4" Circle Punch #119861
1 3/8" Circle Punch #119860
1" Circle Punch # 119868
Dimensionals #104430
Old Olive, Rich Razzleberry, Basic Black, & Whisper White Card stock
Basic Black Classic Ink
Toothpicks, Florist Foam, Paper Shreds from your local craft store


Halloween Treat!

I will be posting a special treat for Halloween later today. Be sure to check back as you won't want to miss it!

Tuesday, October 26, 2010

Well Wishes with the Big Shot


Here is one of the cards we made last week in my Big Shot Club. It's a fairly simple card using one the the textured plates with the Big Shot Die Cutting Machine for the background. The stamp is from the Wellness Wishes stamp set, so adorable for someone who's under the weather. I stamped it in black StazOn and then water colored the image with ink and the Aqua Painter. To make the white dog "pop" I added color all around the white image to make it stand out. This is something I learned at convention two years ago when I was choosen by the "You Crew" to do a make n' take with Brent Steel from Stampin' Up! It was great because he showed us how to water color and build on the colors and because of this I love this technique more than ever. If this is something you would like to learn I would love to share it with you, contact me today to learn how.

Click here to order Stampin' Up! 24/7


Supplies........................................................
Big Shot Die Cutting Machine #113439
Texture Plates #4 #114531
Wellness Wishes # 115356
Stampin' Dimensionals #104430
Aqua Painters #103954
Jet Black StazOn Ink Pad #101406
Early Espresso, Soft Suede, Cherry Cobbler, Crumb Cake Classic Ink
Early Espresso, Soft Suede, Very Vanilla Card stock


Monday, October 25, 2010

Social Saturday Winner

Hi everyone, sorry it took me so long but we have a winner for the post from this last Saturday in which I asked whats your favorite Christmas Stamp Set? And that winner is.......

Patti who commented "My favorite is Bells and Boughs. The images are beautiful and so versatile."

Thanks for playing along Patti! If you'll email me your  address by Friday I will get your card out to you in the mail. For everyone else please come back and play this next Saturday. I would love to hear from you and this is an easy way to get one of my hand made creations! Here is the card Patti will receive:


Another Sneak Peak.....Last day to RSVP


Here is another sneak peak at one of the cards we will be making next weekend and the Christmas Stamp A Stack. Today is the last day to RSVP, I've extended the dealine a couple of days in hopes a few more people will join us! Remember if you bring a friend both you and your guest will receive free envelopes to stamp to match your cards, just be sure to let me know your bringing someone so I can reserve their seat too! Here are the details:

What: Christmas Stamp A Stack
$20/12 Cards
Where : My House 
 4801 Irving NW #1403, 87114
When: There are 3 session, please pick one!
    Friday October 29th 6:30 pm  - 6 seats open
       Saturday October 30th 1:00 pm  - 2 seats open
       Monday November 1st 6:30 pm - 4 seats open
Please RSVP by Saturday October 25th as space is limited for each session.
To RSVP please email me and indicate which session you would like to attend!


Saturday, October 23, 2010

Social Saturday

I thought it would be fun to start a weekly post in which I can hear from you. I post all week about my thoughts, share my samples, and share with you what I have been working on but this is my opportunity to hear from you. So each week I will post a question and I want to hear your answer. To respond simply add a comment to the post before I randomly choose one comment on Monday. The persons who comment is chosen will receive a special handmade card made by me! Be sure to check back to see if your comment won!

Christmas is my favorite time of year and I have always loved sending out Christmas cards. I especially love that now that I stamp my own cards I can send warm wishes for the holiday along with a hand made gift to all my loved ones! And I absolutely love all the Christmas sets that Stampin' Up! has to offer. But if I had to choose just one, and this is so hard, I think I would have to choose Greeting Card Kids. I wasn't sold on this set at first, but after all of the samples I have seen made with this set I have fallen in love with it. It's probably because I love the vintage look and it is so easily achieved when this set it used. But enough about me, whats your favorite Christmas stamp set?

Friday, October 22, 2010

12 Weeks of Christmas - Week 3

This is the card that we made at our stamp club this last weekend. It's not your average Christmas card and I must admit that I CASED this card from Renee Fenlason who sent me a similar card as part of a Vintage Christmas Card swap that I hosted. I thought this would be the perfect card to showcase to my club as I knew that most of them had purchased this set and I wanted to encourage them to get creative, especially if they have limited supplies. I won't go into every step to make this card, but I will give the general details of it. Every layer is sponged around the edges including the designer series paper. We used the markers to color the stamp and stamped it on Very Vanilla card stock. We then ran it through the Big shot with the Square Lattice embossing folder. To make it look aged I used the Tea Stain ink spot from the distressing kit and sponged this to make the white look aged. And last but not least we added the Vintage Brad for the finishing touch, and spitzed the entire card with gold Glow Smooch Spritz. I  think the key to this card and all the little details such as the sponging, it just gives it that vintage look which I absolutely love! 

Click here to order Stampin' Up! 24/7!

Supplies.....................................................
Big Shot Die Cutting Machine #113439
Square Lattice Embossing Folder #119976
Elements of Style Stamp Set W#118611 C#120045
Tenny tiny Wishes Stamp Set #115370
Word Window Large Punch #119857
Modern Label Extra Large Punch #119849
Antique Brads #117273
Distressing Essentials #118762
Deck the Halls Designer Series Paper #120810
Gold Glow Smooch Spritz #118770
Old Olive Marker #100079
Cherry Cobler Marker #119681
Soft Suade, Early Espresso Ink
Soft Suade, Early Espresso, Very Vanilla Cardstock


Thursday, October 21, 2010

Halloween Ornament


Here is another project that I made a couple of weeks ago with my upline Brenda. It's a Halloween Ornament made using the Mini Milk Carton Bigz L Die. First we cut out the Milk Carton using the Big Shot Machine and adheared a moon using 1 3/8" circle punch in Daffadil Delight and then the 1 1/4" circle punch in Old Olive. Then we used the Haunting Hill Wheel in black ink and rolled it across before we assembled the milk carton. The roof is a piece of pumpkin pie which was run though the Big shot machine as well using the Spider Web Embossing folder which is in the Holiday Mini Catalog. We wrapped a piece of ribbon around the roof before adhearing, added some bats, and a ribbon of the glass glitter along the edge of the roof to give it some pop. Oh, and did I mention that before we assembled it we filled it with candy!


Supplies......................................................
Big Shot Die Cutting Machine #113439
Mini Milk Carton Bigz L Die #117310
1 3/8 Circle Punch #119860
1 1/4 Circle Punch #119861
Bitty Bat Large Punch #119279
Stampin Around Jumbo Handle #103661
Haunting Hill Wheel #116539
Basic Black 1/4" Grosgrain Ribbon #109027
Tombo Multipurpose Liquid Glue #110755
Silver Glass Glitter #120995
Basic Blac Ink
Rich Razzleberry, Old Olive, Daffadil Delight, Pumpkin Pie Card Stock

Spots are filling quickly.....

Hi everyone, I will post a card later today but I wanted to give a quick update on the Christmas Stamp A Stack. Spots are filling quickly and there are only a few more days to RSVP. Remember if you bring a friend both you and your guest will receive free envelopes to stamp to match your cards, just be sure to let me know your bringing someone so I can reserve their seat too! Here are the details:

What: Christmas Stamp A Stack
Where : My House 
 4801 Irving NW #1403, 87114
When: There are 3 session, please pick one!
    Friday October 29th 6:30 pm  - 6 seats open
       Saturday October 30th 1:00 pm  - 2 seats open
       Monday November 1st 6:30 pm - 4 seats open
Please RSVP by Saturday October 23rd as space is limited for each session.
To RSVP please email me and indicate which session you would like to attend!

Please note that this may be the last class I hold for the rest of this year. I would love to see you all before the holidays!

Wednesday, October 20, 2010

Vintage Punch Potpourri


This is the card I made for my friend Elva's birthday last weekend. She is a very classy girl and I thought creating a vintage looking card would be perfect for her! I embossed the bird from the Punch Potpourri hostess stamp set and punched it out using the bird punch. I put one of the antique brads through the wing of the bird and popped it up using a dimensional. I created layer using card stock and designer series paper. I also stamped the heart from the same stamp set on the designer series paper in cherry cobbler to help build on the layers of the card. I ran the black card stock through my Big Shot Machine using the Vintage Wallpaper embossing folder. I used the cutter kit to wear the edges of the card stock and make it look worn. As a finishing touch I spayed the card with Silver Foil Smooch Spritz to give it a little sparkle which I know Elva loves.


Supplies.........................................................
Punch Potpourri Hostess Set W#118394 C#120124
Teeny Tiny Wishes Stamp Set #115370
Two-Step Bird Punch #117191
Antique Brads #117273
Victoria Crochet Trim #118481
Linen Thread #104199
Newsprint Designer Series Paper #117166
Clear Embossing Powder #109130
Silver Foil Smooch Spritz #118771
Cutter Kit #106958
Dimensionals #104430
Cherry Cobbler, Basic Black, Very Vanilla Card stock
Cherry Cobbler Ink

Tuesday, October 19, 2010

Stampin' Up! Holiday Bundles - Save 20%

Announcing the ABC's of the Perfect Handmade Holiday.  Starting TODAY, Stampin' Up! is offering an opportunity to purchase select products--perfect for Amazing cards, Beautiful packaging, and Cherished gifts--at a 20 percent discount!
CLICK HERE to open and print the Holiday Bundle List.  Includes French and Spanish options.
Things to Remember:
  • Additional products from current catalogs may be purchased on the same order.
  • There is no minimum purchase required to participate in this promotion.
  • You must use the bundle item codes provided. The 20 percent discount will not be applied if individual bundle item numbers are entered separately.
  • Order on-line by Thursday, December 16, 2010; 11:50 PM (MT)


Spooky Punch Art Easel Card

Here is an easel card I made for Halloween. I used the owl punch to make the ghost and also for the body of the bat. For the bat's wings I used the large oval punch and then punched the ovals with the  scallop circle punch. I created the pumpkin by punching out 3 1 3/8" circles, sponging the edges in the same color as the cardstock and adding a little hand cut stem. The moon in the background is the 1 3/4" Circle punch. I just love the easel cards because they just beg the recipient to display the card for everyone to see. And this couldn't be easier because they are designed to stand up all be themselves. 


Supplies......................................................
All Holidays Stamp Set W#114916
Wicked Fun Specialty Designer Series Paper #117400
Two - Step Owl Punch #118074
1 3/8" Circle Punch #119860
1 3/4" Scallop Circle Punch #119854
1 3/4" Circle Punch #119850
1 3/4" x 7/8" Oval Punch #119855
Scallop Oval #119856
Stamping Sponges #101610
Basic Black, Daffodil Delight, Pumpkin Pie, Whisper White and Old Olive Cardstock
Basic Black Classic Ink
Whisper White Craft Ink


Monday, October 18, 2010

Stamp A Stack is Filling Up!

Here is a sneak peak at one of the cards we will be making at my upcoming Stamp A Stack.


Don't delay! I have three sessions open for my Christmas Stamp A Stack and they are filling up quickly. There is only one more week to RSVP so contact me today to reserve your seat! This is a great opportunity to make your Christmas cards and have them done and in the mail by Thanksgiving! We will be making 3 cards each of 4 designs for a total of 12 cards.

What: Christmas Stamp A Stack
Where : My House 
 4801 Irving NW #1403, 87114
When: There are 3 session, please pick one!
    Friday October 29th 6:30 pm  - 6 seats open
       Saturday October 30th 1:00 pm  - 4 seats open
       Monday November 1st 6:30 pm - 5 seats open
Please RSVP by Saturday October 23rd as space is limited for each session.
To RSVP please email me and indicate which session you would like to attend!


Saturday, October 16, 2010

Social Saturday

I find that time and time again when I'm creating a card I try to make it look old and worn. A technique I would call "aging" as I sponge and tear and crumple the cardstock. It must be because I just love the Vintage look. Any thing old and classic catches my eye. I love to go to antique stores and look through all the things that have been around longer than I have. If they could talk the stories they might tell!

So what's your favorite technique and why?


Friday, October 15, 2010

12 Weeks of Christmas - Week 2

Last week I met with my upline for a small gifts class and we made a pair of these mittens, aren't they cute! She bought the mittens for about $0.75 at a local store. We took two top notes cut out with the Big Shot machine and scored twice in the middle creating two flaps and a flat edge after they are folded. One of the top notes in DSP and the other in regular cardstock to add thickness. We layered them, added a tag, and attached the ribbon through the mittens and around the top note. It's hard to see but we also decorated the snowman on the tag with Dazzling Diamonds to give it a little sparkle. Wouldn't these just be darling hanging on your tree for everyone in the family!


Supplies......................................................
Tags til Christmas W#120847 C#121169
Big Shot Machine #113439
Top Note Die #113463
1 3/4" Scallop Punch #119854
1 3/8" Circle Punch #119860
Candy Cane Christmas Designer Series Paper #120809
Blushing Bride 1/2" Stitched -Poly Ribbon #119267
2-way Glue Pen #100425
Dazzling Diamonds #102023
Blushing Bride, Real Red, Whisper White Cardstock
Bashfull Blue Ink


Thursday, October 14, 2010

Pigments Holiday Stamp Camp - Everyones Invited!

Announcing the 2nd annual Pigments Holiday Stamp Camp! Once again we will combine creative minds for an afternoon of fun, crafting, and preparation for the Holidays! Our stamp camp will be on November 14th from 2:00-5:00. There will be 6 different projects ranging from cards to gifts for the holidays. The cost for the event is $29.00 if you register by Nov. 5 and $34.00 if you register after this date. This includes all projects AND $10.00 off your order placed that day! This event will be held in one large room where we're all together stamping, with table and chairs, snacks, samples to take pictures of, and PRIZES!!!!!! There will also be "Retired Rubber" for sale so bring some cash for those stamps set that you just love but can no longer buy from Stampin' Up! If you would like to register for this event or would like more information please click here!


Blog Candy Winner!!!!

And the winner is..........

albqjrXXXX.com

If this is your email please email me at lovetostamp4fun@yahoo.com by this Sunday with your name and address so that I can mail your Peaceful Season stamp set to you! Thanks to everyone you subscribed to my blog! I promise you won't be disappointed!

On another note, I was sad to see no one commented to the Social Saturday post and therefore this card will not have a home this week.....


However, there is one more chance to win this card for yourself. Check back this weekend and leave me a comment on this weekends Social Saturday. Can't get to a computer Saturday? No worries, just leave me a comment anytime before I choose a winner on Monday morning in reply to Saturday's post. I want to hear from you and find out what you like and what you want to see more of so don't be shy!

Wednesday, October 13, 2010

Pick A Petal 2


Here is another card that we made in the Pick A Petal class. This lady bug could be made using any of the petal stamps. I used the 3/4 circle punch for the head and body and the owl punch for the eyes. This lady bug would be a wonderful accent on a scrapbook page. I just love how versatile this stamp set is! I also used the grass stamp from the Inspired By Nature set for the background which is large enough that it would create the perfect background on a 12 x 12 scrapbook layout.


Supplies........................................................
Pick A Petal Stamp Set W#115042
Inspired By Nature W#111656
3/4" Circle Punch #119873
Two Step Owl Punch #118074
Basic Black Marker #100082
Old Olive, Whisper White, Basic Black Cardstock
Real Red, Old Olive, Basic Black Ink

Tuesday, October 12, 2010

Pick A Petal


Here is one of the cards we made a few weeks ago in the Pick A Petal Class. We made several cards and none of them had flowers. This one is a couple of surf boards in the sand at the beach! I wanted to show how versatile this stamp set really is. There are many different things you can make with the shapes of the petals. I post more samples soon!


Supplies.........................................................................
Pick a Petal Stamp Set W#115042
Teeny Tiny Wishes Stamp Set W#115370  
Color Spritzer Tool #107066
Basic Black 1 1/4 Stripped Grosgrain Ribbon #115615
Sahara Sand and Marina Mist Markers
Daffodil Delight, Marina Mist, Sahara Sand, Whisper White Cardstock
Cajun Craze, Cherry Cobbler, Marina Mist, Sahara Sand, Basic Black Ink


Monday, October 11, 2010

Blog Candy

Well I think it's time to give away some Blog Candy! How would you like to receive the Peaceful Season stamp set for FREE? This is a hostess set in the Holiday Mini and can not be purchased, but it could be yours if you win. All you need to do to enter is to either become a follower on my blog or subscribe to updates from my blog. I will randomly choose a winner on Thursday, October 16 so don't delay.....

Saturday, October 9, 2010

Social Saturday

I thought it would be fun to start a post in which I can hear from you. I post all week about my thoughts, share my samples, and share with you what I have been working on but this is my opportunity to hear from you. So each week I will post a question and I want to hear your answer. To respond simply add a comment to the post. On Monday's I will choose the best response and mail the winner a special handmade card made by me! So lets get started....


I just love the new Glass Glitter that's in the Holiday Mini Catalog. It's chunky and fun, and adds bling to any project. Overtime the finish will tarnish just slightly giving it an aged vintage look (which I love). And because it's not made of the same material as regular glitter it does not have static electricity so it doesn't stick to everything which makes it easier to clean up! Whats your favorite Stampin' Up! embellishment and why?

Friday, October 8, 2010

12 Weeks of Christmas - Week 1


Here is my first treat for my 12 Weeks of Christmas. I made this card for a swap I hosted  last month in which the theme was "Vintage Christmas." I am so pleased with Stampin' Up's! new vintage products they introduced in the 2010/2011 Idea Book & Catalog. I used the tea stain and mahogany inks from the distressing kit to make this card look old and "dirty." The pearls add that little touch to attract your eye to the sentiment. The flowers are water colored and I stamped them twice, cut them out, and then layered them with dimensional to give it a 3 dimensional look. As a finishing touch I spritzed the entire card with the Gold Smooch spritz to give it a little sparkle.


Supplies.........................................................
Bells & Boughs Stamp Set W#120831 C#121142
Deck the Halls Designer Series Paper #120810
Cherry Cobbler 1/2 Seam Binding #120992
Distressing Essentials #118762
Aqua Painter #103954
Basic Pearls #119247
Gold Glow Smootch Spritz #118770
Square Lattice Embossing Folder #119976
Very Vanilla, Always Artichoke, Cherry Cobbler cardstock
Aways Artichoke, Cherry Cobbler, River Rock, Riding Hood Red, Chocolate Chip Ink


12 Weeks of Christmas

Starting today I will begin a weekly post for the 12 Weeks of Christmas. Can you believe Christmas is only 12 weeks away!Christmas is my absolute favorite time of year. I always say it's the only thing I like about the cold weather months. I put my Christmas tree up on Thanksgiving and I don't take it down until after New Year's. After all, you go through all the work of decorating it so you might as well enjoy if for a while. Each week until Christmas I will share a special project that perfect for this holiday season. Check back tonight as I will post week 1 of the 12 Weeks of Christmas!

Thursday, October 7, 2010

Just Announced: Christmas Stamp A Stack!

Want to get your Christmas Cards done early? Want them to be hand made but don't have any ideas or time to prep them all? Well, come to my Christmas Stamp A Stack and be ahead of the game by the 1st of November!  I will have 3 different sessions to accommodate your schedule, all sessions are the same just different times! We will be making 3 cards in 4 different designs for a total of 12 cards. You may request additional packets for $20 each if you would like to make more than 12 cards. I will also have envelopes on sale for $3.00/12 if you would like to stamp them to match your cards. Bring a guest and you both will receive your envelopes for free!

What: Christmas Stamp A Stack
Where : My House 
 4801 Irving NW #1403, 87114
When: There are 3 session, please pick one!
    Friday October 29th 6:30 pm
       Saturday October 30th 1:00 pm
       Monday November 1st 6:30 pm
Please RSVP by Saturday October 23rd as space is limited for each session.
To RSVP please email me and indicate which session you would like to attend!

Top Note Purse


This is one of the cards we made at Septembers Big Shot club. The purse is made simply by folding down the top note. I think the card is very elegant with the use of the Greenhouse Gala DSP.  You could easily transform this for any occasion and given to your best girlfriend! Would you like to learn more ways to use the Big Shot Die Cutting Machine? Or would you like to buy your very own but can’t afford to purchase it all in one shot? Then check out the details for my Big Shot Club.

Click here to order Stampin' Up! 24/7

Supplies………………………………………………………
Teeny Tiny Wishes #115370
Big Shot Die-Cutting Machine #113439
Vintage Wallpaper Embossing Folder #120175
Tope Note Die #113463
Greenhouse Gala Designer Series Paper #117167
Certainly Celery Satin Ribbon #117288
Basic Rhinestones #119246
Marina Mist, Early Espresso Cardstock

Wednesday, October 6, 2010

Current Stampin’ Up! Workshop Projects


How would you like to learn how to make these projects and get to make one of your own? Would you like invite your friends and have a girls afternoon of fun? Then contact me today to book your workshop. These are the projects I am currently featuring in my workshops. Is there something else you would like to learn? I can tailor any workshop around what ever it is you would like to see. It doesn’t matter how big or how small your workshop is, just that you and your guest have fun! Check out my Calendar to see what dates are available. I can do evening during the week or anytime on the weekends.

Tuesday, October 5, 2010

Cards at the New Mexico State Fair

So, I've always wanted to enter my cards into the New Mexico State fair, however I always seem to miss the deadline. Well, I didn't this year and I couldn’t be happier. I entered two cards, one in the Holiday category and one in the Occasions category. Well, I won first and second place with my cards so I would like to share those with you today!

This is my entry into the Holiday category and I won 2nd place! Some of you may recognize this card as it was my Christmas card I mailed out last year. There are many steps in this card and if you consider that I had to make 60 cards I think I must have been crazy. But I got them all made a mailed out on time and this second place ribbon was the icing on the cake!


Click Here to Order Stampin' Up 24/7


Supplies………………………………………………………
Holiday Lineup #111648
Many Merry Messages # 116586
Big Shot Die- Cutting Machine # 113439
Texturz Plates Backgrounds 1 #114512
Snowflake Extra Large Punch #119852
Gold Embossing Powder # 109129
Heat Tool # 100005
Dazzling Diamonds #102023
Bravo Burgundy, Always Artichoke, Whisper White Cardstock
Various Markers for coloring
Mini Red Pompoms for nose (local craft store)


This is my entry into the Occasions category and I won 1st place.
You can see how I used dimensionals to lift up portions of the flower that I cut out so that it would look 3-D. I think this is what hooked the judges!


Click Here to Order Stampin' Up 24/7

Supplies………………………………………………………
Because I Care W#118384 C#120118 (Hostess Set)
Pear Pizzazz, Marina Mist, Bashful Blue Cardstock
Marina Mist Ink
Bashful Blue, Pear Pizzazz Marker